Saturday, September 26, 2015

Hammock Retreat

Hammock Retreat

This has to be one of my absolute most favorite additions to the backyard. As usual, I was "Pinteresting" (not yet a verb, but will be... just like Google) to find ideas. Anyway, I love to backpack and do all things outdoor, but why leave my hammock all balled up in between backpacking trips when I have a perfectly "hammockable" yard out back? 

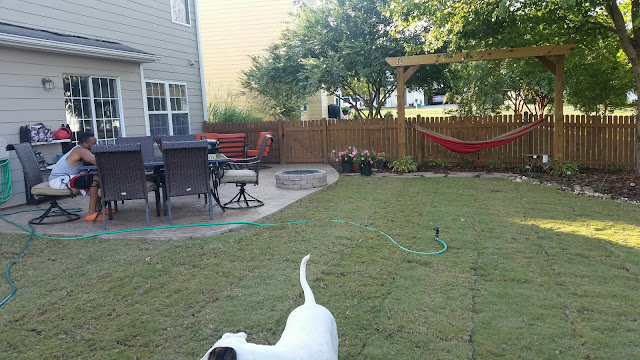
With exactly 1 tree in the backyard, however, I had to come up with an idea to hang the hammock, while adding to the aesthetics of the backyard. I wanted a permanent structure (vs. a relatively inexpensive and less eye catching portable alternative). So... with the help of Pinterest and some creative ideas of my own, a project was born.

Here is the backyard before:


Materials I decided I needed:
2- 12ft. 6x6 pressure treated posts
2- 10ft 2 x 10 pressure treated boards
2 bags of sakrete
8, 1/2" x 10 inch bolts with nuts
2, 8 inch eye bolts with nuts
6, 4 in lag screws


Instructions:
Cut off 2 feet from the 6x6 posts and save for later in the project
Dig holes 2 feet in ground double the size of the post
Insert posts into ground, use a level to ensure that it is level on all sides and secure using temporary braces as shown in picture. (I used old 4 x 4 posts from a previous raised garden)
Pour concrete in hole and fill with water
Wait for concrete to set (we waited 48 hrs to make sure it was completely dried through)


I cut off a corner of the "cross beams" to give it a decorative look. I clamped the cross beams together in place and drilled through them using a 1/2in x 12 in long drill bit and an electric drill. This was NOT easy... The 2 foot section you cut off the original posts will now be trimmed with 45 degree angles on each end and attached using lag screws into the upper corners of the structure. (picture below) It's meant to be decorative rather than structural, so just make sure it's secure and you're good to go.

With everything bolted in, it's now ready to install the hammock hangers (eye bolts).


Install the eye bolts evenly on each side. I think I installed the hammock at a height that allowed me to sit on the hammock and swing but also lay in it at a reasonable distance off the ground. For decoration, I laid large stones (about 6$ each) to get to the hammock and mulch and plants all around. The hostas were transplanted from another area, which is why they look as though they are dying- they're in a little shock. 


We laid sod down a little later in the summer and the backyard has come such a long way. It's now one of my absolute most favorite places to lounge around on a weekend day! 

Monday, September 21, 2015

Patio Bar (aka Murphy Bar)

I love company. I love entertaining. I love cooking for large groups of people. I HATE having to go back in the house 5 million times to bring stuff outside. I also hate table clutter. I'll build a bar! Problem solved

When I got the FINAL idea in my head about what it would look like, I dragged myself out of my hammock and to Home Depot I went! I will try to be as detailed as possible, so you can recreate this because, quite honestly, it's PERFECT!

Materials Needed:
2- 8ft sections of Pine Select 1 x 6
1- 2' x 4' hardwood plywood
1- 3 ft section of Pine Select 1 x 2
# 3 chain, 5 ft in length (this will leave a little extra to cut off- each side needs about 2 ft.)
2 long hinges (piano hinge, but mine isn't that long)
Exterior screws
Eye hook with latch
"s" hooks and eye hooks (for chain)
decorative knob
paint and/or stain
heavy duty picture hangers
I used pocket holes to secure the corners

Measurements:
Box measures 36" x 21" (height include the back of the shelf on top)

Suggestions: Build the box first. Then lay the plywood on top and cut out for the perfect fit. Test and retest the hinge to make sure you are installing everything correctly and that everything closes. To attach to the house, I installed a "bracket", drilled into the studs through the hardiplank. I then mounted the box using the heavy duty picture hangers right to the bracket.


Unfinished (obviously)


To give it this "distressed" look, I used a dark walnut stain over the whole box. By the time I was done putting a coat of stain on the whole thing, I immediately began to paint over it with the color (in this case, it was a sage green "craft paint"). When you brush it on, some of the stain mixes with the color and may darken the color slightly. It also pokes through the paint giving it a very old and rustic feel. Remember: You can hardly mess up what's intended to look like it's messed up. So have fun with it and don't think too much about it.


I researched some "outdoor signs" on Pinterest to get an idea of what I wanted to put on the outside. I have tons of different sized/ style stencil letters, so I went with this look. 


For the inside, I wanted a vibrant color that 'popped' When the bar is stocked, the red background helps to contrast the contents and is really much more fun than just a dark stain interior.


This picture allows you to see just how compact it is as contrasted to the whole patio setup. It turned out better than I had expected. It got a clear coat of polyurethane to protect it from the elements and it just happened to shine it up a bit too! Bonus! 


I also installed a hook for a wine cork to hang on the inside as well.