Tuesday, April 11, 2017

All You Need Is A Hammock And Some Friends

There is nothing I have come to hate about camping. When I first started adventuring out into the woods, I had a fear of the unknown- the wildlife, the difficulty of the hike, the unpredictable weather- but I have come to develop a healthy respect for all of that which has displaced my fear quite a bit. What I have come to appreciate about camping is the solitude, the serene beauty of the landscape, the welcoming feel of the wilderness and just how big the world outside of my city really is.

This weekend, we decided to head down to Brevard, NC where Pisgah National Forest is easily accessible and the trail system massive. This has to be one of my favorite little towns honestly. It's home to something like 200 waterfalls and it's just nestled into the woods so quietly, it still holds onto most of it's quaint small town charm. I usually have "7 jobs" on these hikes. Most important one is usually planning the route. So I broke out the trusty map and went to work. I'm not a fan of out and back hikes (there is SO MUCH to see that you don't have to double back on anything) so I decided on a shuttle hike leaving out of Black Mountain and ending at Turkey Pen Trailhead. Trailheads were about 7.5 miles apart as the car goes, but the hike ended up being 12.5-13 miles the whole way.

We stayed at the beautiful Davidson River Campground on Friday night, thanks to my "bestie in the westie" Meredith for snagging the last walk up first come, first serve campsite. Car camping isn't this group's favorite thing, but when you are driving in from Raleigh, NC and need a sure place to rest the night before a long hike, you take what you can get.

Saturday morning, we headed over the base of Black Mountain and the Black Mountain Trailhead. Wouldn't you know that on that very morning a huge endurance mountain bike race had started? Lucky for us, we hit the trail at the right time.

Before I get into the trail description,  I want to say this. This first part of the trail is not easy. It's not even moderate. It's difficult. It's 4.5 miles straight uphill. There's nothing about the first part that was pleasant, actually. And that's just being honest. I was dreading my decision to start at this trail. Not even gonna lie. So... we started at Black Mountain and ascended 4.5 miles up to the summit of Black Mountain. Near the top, it intersects with the Turkey Pen Gap Trail. Right at the intersection there is a small campsite on the left, suitable for 1-2 tents and has a small fire ring. We continued past the junction of the two trails to the summit of Black Mountain for a view and lunch stop. This is just a little ways past the intersection of the two trails. It was a "tunnel" of rhododendron that we walked through.


The view was stunning. What you are seeing here is the view from a small rock outcropping at the top of Black Mountain. It was quite windy and cold up here, but we bundled up and got some food in our bellies. From the picture on the right, you can see Looking Glass Rock (middle of the picture).


After a long rest, some photo ops, and a packless exploratory hike along the ridge, we saddled up and headed back down the mountain to continue our journey. We took a left on Turkey Pen Gap trail and were very pleased to find that for the next 3.5 miles, there was a mix of uphill and downhill terrain. For this I was thankful because I wasn't ready for any more ridiculous climbs.

At the junction of Turkey Pen Gap Trail and Wagon Road Gap Trail was a small campsite. We turned left down Wagon Road Gap trail and descended about .6 miles to the junction of this trail and the South Mills River Trail. The scenery really changed on this trail. I wish I knew the names of all of the foliage, but I know there was quite a bit of fern growing in this area, which I think is really pretty when the sunlight pokes through the trees and hits it.

About a half mile down the trail, there is a large campsite on the left suitable for a small village. The small stream that runs alongside the trail here sort of dives in and out of the thicket, but it is accessible if water is needed. We dropped pack here, left a hiker behind and headed a little further to see if anything else was available in the way of sites. We got to the junction of the Wagon Road Gap Trail and South Mills River Trail and hit campsite gold mine. This campsite was large and flat with two fire rings and was about 20 yards from the beautiful South Mills River. We immediately dropped pack and hung the hammocks, thankful for a place to put our feet up after ~10 miles of up and down hiking.


There are quite a few dead hemlocks at this site which made for ample firewood BUT be careful about where you hang your hammock and your liable to pull one straight out of the ground from the roots. Yes, that happened to us and my tent, dog, and I were almost crushed! You would think that your engineer friend would know not to hang a hammock from a dead tree, but this was not the case.

The next morning, we lounged around for a while as we knew that we had less than 3 miles to the Turkey Pen Gap Trailhead to end our shuttle hike. Immediately after leaving the campsite we headed northeast (turned right) on the South Mills River trail and hit the first of two footbridges we would need to cross on our way back. The first 1.5 miles of this return trip was a flat and fast and there were plenty of riverside campsites to choose from.


Made it to the Turkey Pen Gap Trailhead to complete the shuttle hike and headed for our post hike beer and food!  All in all, a great trip. I wouldn't recommend the first 4.5 miles to a beginner hiker, but we made it work and thoroughly enjoyed the whole weekend.


Saturday, September 26, 2015

Hammock Retreat

Hammock Retreat

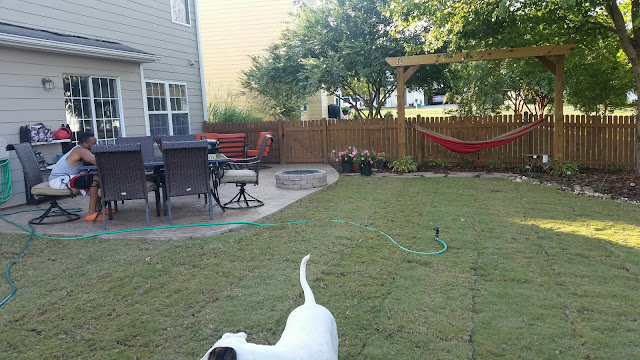
This has to be one of my absolute most favorite additions to the backyard. As usual, I was "Pinteresting" (not yet a verb, but will be... just like Google) to find ideas. Anyway, I love to backpack and do all things outdoor, but why leave my hammock all balled up in between backpacking trips when I have a perfectly "hammockable" yard out back? 

With exactly 1 tree in the backyard, however, I had to come up with an idea to hang the hammock, while adding to the aesthetics of the backyard. I wanted a permanent structure (vs. a relatively inexpensive and less eye catching portable alternative). So... with the help of Pinterest and some creative ideas of my own, a project was born.

Here is the backyard before:


Materials I decided I needed:
2- 12ft. 6x6 pressure treated posts
2- 10ft 2 x 10 pressure treated boards
2 bags of sakrete
8, 1/2" x 10 inch bolts with nuts
2, 8 inch eye bolts with nuts
6, 4 in lag screws


Instructions:
Cut off 2 feet from the 6x6 posts and save for later in the project
Dig holes 2 feet in ground double the size of the post
Insert posts into ground, use a level to ensure that it is level on all sides and secure using temporary braces as shown in picture. (I used old 4 x 4 posts from a previous raised garden)
Pour concrete in hole and fill with water
Wait for concrete to set (we waited 48 hrs to make sure it was completely dried through)


I cut off a corner of the "cross beams" to give it a decorative look. I clamped the cross beams together in place and drilled through them using a 1/2in x 12 in long drill bit and an electric drill. This was NOT easy... The 2 foot section you cut off the original posts will now be trimmed with 45 degree angles on each end and attached using lag screws into the upper corners of the structure. (picture below) It's meant to be decorative rather than structural, so just make sure it's secure and you're good to go.

With everything bolted in, it's now ready to install the hammock hangers (eye bolts).


Install the eye bolts evenly on each side. I think I installed the hammock at a height that allowed me to sit on the hammock and swing but also lay in it at a reasonable distance off the ground. For decoration, I laid large stones (about 6$ each) to get to the hammock and mulch and plants all around. The hostas were transplanted from another area, which is why they look as though they are dying- they're in a little shock. 


We laid sod down a little later in the summer and the backyard has come such a long way. It's now one of my absolute most favorite places to lounge around on a weekend day! 

Monday, September 21, 2015

Patio Bar (aka Murphy Bar)

I love company. I love entertaining. I love cooking for large groups of people. I HATE having to go back in the house 5 million times to bring stuff outside. I also hate table clutter. I'll build a bar! Problem solved

When I got the FINAL idea in my head about what it would look like, I dragged myself out of my hammock and to Home Depot I went! I will try to be as detailed as possible, so you can recreate this because, quite honestly, it's PERFECT!

Materials Needed:
2- 8ft sections of Pine Select 1 x 6
1- 2' x 4' hardwood plywood
1- 3 ft section of Pine Select 1 x 2
# 3 chain, 5 ft in length (this will leave a little extra to cut off- each side needs about 2 ft.)
2 long hinges (piano hinge, but mine isn't that long)
Exterior screws
Eye hook with latch
"s" hooks and eye hooks (for chain)
decorative knob
paint and/or stain
heavy duty picture hangers
I used pocket holes to secure the corners

Measurements:
Box measures 36" x 21" (height include the back of the shelf on top)

Suggestions: Build the box first. Then lay the plywood on top and cut out for the perfect fit. Test and retest the hinge to make sure you are installing everything correctly and that everything closes. To attach to the house, I installed a "bracket", drilled into the studs through the hardiplank. I then mounted the box using the heavy duty picture hangers right to the bracket.


Unfinished (obviously)


To give it this "distressed" look, I used a dark walnut stain over the whole box. By the time I was done putting a coat of stain on the whole thing, I immediately began to paint over it with the color (in this case, it was a sage green "craft paint"). When you brush it on, some of the stain mixes with the color and may darken the color slightly. It also pokes through the paint giving it a very old and rustic feel. Remember: You can hardly mess up what's intended to look like it's messed up. So have fun with it and don't think too much about it.


I researched some "outdoor signs" on Pinterest to get an idea of what I wanted to put on the outside. I have tons of different sized/ style stencil letters, so I went with this look. 


For the inside, I wanted a vibrant color that 'popped' When the bar is stocked, the red background helps to contrast the contents and is really much more fun than just a dark stain interior.


This picture allows you to see just how compact it is as contrasted to the whole patio setup. It turned out better than I had expected. It got a clear coat of polyurethane to protect it from the elements and it just happened to shine it up a bit too! Bonus! 


I also installed a hook for a wine cork to hang on the inside as well. 

Tuesday, February 3, 2015

Stairway to... the 2nd Floor

Final touch to the new staircase and foyer. (Aside from decorating). We have wainscoting in our dining room and I always thought it looked so nice, but also very expensive. So I took to my good and trusty friend Pinterest to help me figure out what to do about wainscoting in my foyer.
For about $120, some serious patience, and a little bit of a creative mind, this is the result.

Chalk out your line. This was about 53" off the baseboard. It got tricky when going off the landing at the top of the stairs but we figured it out. 

My wood choice was the basic 1x4 Whitewood. Since I knew it would be painted, it was the economical option. 


You will need to caulk all the joints. Very important step to making this look like a flawless,  professional job. 

Oh and the wood was glued and nailed to the wall. Wherever possible, I used studs, but this is why the glue comes in really handy. 


Add the 1x2 chair rail along the top. Glue and nail in place. Caulk the joints. For the paint, I used the same color as my trim work. Obviously, this helps to make it appear as if it's always been like that. 


Add your "flare". Boom! 


What do you think?! 

Monday, November 17, 2014

Particle-wha?!?! Particle-where?!?!

"Particle board?!?! You can't cover Particle Board!!!"


They said it couldn't be done. They said I was "crazy". But, I attempted the impossible anyway!!! Just look at those ugly stairs. And right next to the beautiful new banister... 


It was definitely a shot in the dark. I didn't really know what I was doing, but I knew my fall back plan could be to just re-carpet the stairs until a better option was available.

Step 1: Remove all tacks and sand legitimate rough spots. Then smooth over a thin layer of wood filler and wait for it to dry.


Step 2: Sand down the step


Step 3: I used a product called DeckOver from Behr- a very thick paint used to restore old decking and concrete surfaces. This product will fill gaps up to 1/4" deep. With 2 solid coats, the stair tread was sufficiently covered and had a nice finish. 

I did use 3 coats of a clear coat as well to gloss it up a bit!


Step 4: Now that all the stairs are covered, I used a beadboard panel (20$ Home Depot) to cover all 13 risers. With a little Gorilla glue and a few brad nails, the finished look was amazing!


The finished product is amazing. You will need to fill the brad nail hole and cover any gaps as necessary (I'm not a perfect cutter). Once I paint the banister, install beadboard and some pops of color, my otherwise drab foyer will be a marvelous entryway for me, my family, and guests to enjoy! 

Wednesday, November 12, 2014

Hardly your average DIY

So, as my husband sits in the living room, watching football, I chopped away at the house...

I should probably back up a bit. I came home on Friday afternoon after an average work week. I don't know why or how, but I got it in my head that I no longer wanted the carpet on the stairs or the enclosed banister in my foyer. And, usually, when I want something to happen, it happens. So... by the time my husband got home that evening all of the trim had been removed from the banister. And he said nothing. That's typical of him, however, he usually lets me do exactly what I want without comment.

My banister and my foyer area have always been an issue for me. It feels like it closes in on you when you walk in the front door. The banister does nothing but collect dust in all the areas. It's about 3 tones of white / neutral color. It's hideous, to be blunt. I wanted it gone. If you don't believe me, here's a picture to prove what I'm saying.


Once the planning began, there was no going back. And my idea for a grand entryway was about to come true- thanks to the help of my wonderfully talented little brother! 

Time to demo!


And the rebuild... 


After you are done gawking at the open banister, gaze over at the stairs... They are particle board and I hate them. But I cannot (structurally and financially) replace the stair treads at this point, so I have a few ideas on how to cover the treads and risers to finish off this amazing addition to our beautiful home. 

Stay tuned for how it all turns out! 

Wednesday, December 11, 2013

Christmas Candles

What happens when you are begging for gift ideas, strapped for cash, and scrambling for time? Pinterest- that's what happens. I decided to troll my friends Pinterest pages for gift ideas this year and came up with quite a few cool projects to tackle this Christmas.

Cinnamon Stick Christmas Candle

This was a pretty easy project, and the most time consuming part was cutting the cinnamon sticks to the appropriate size. Depending on the candle and whether you use a 50% off coupon at Michael's, the candle could run close to 10$ each. But it's cuteness is worth it.


Gather your supplies. You will need:

A candle (I chose red for this blog, but I also used white ones. FInd them cheap at Ross, TJ Maxx, Marshalls, and Home Goods or use the 50% coupon at Michael's and get them for a steal.)
Bag of cinnamon sticks (also at Michael's, enough in 1 bag to do 1 1/4 candles)
Christmas ribbon
Burlap string
Hot glue gun
Cutting board and serated knife (how I cut the cinnamon sticks)

Steps:
1. Cut the cinnamon sticks to varying lengths, ranging from 3/4 of the way up the candle to about a little 1/2 way up the candle. See picture above. This gives it a staggered look. The best way to cut the sticks without shredding them to pieces is to put the stick on a cutting board and carefully scoring it with the serated knife. Then GENTLY snap the stick in two and repeat with next stick.
2. Once you've cut varying sizes, line them up side by side to visualize what it will look like on the candle. 

3. Begin gluing them onto the candle using the hot glue gun. 

4. Once finished, it should look something like this.


5. Glue the Christmas ribbon on and tie the burlap string around in a bow. DONE! 

I paired it with some Christmas bark for a nice gift to girlfriends. 

Let me know what you think!